


What is Webpack
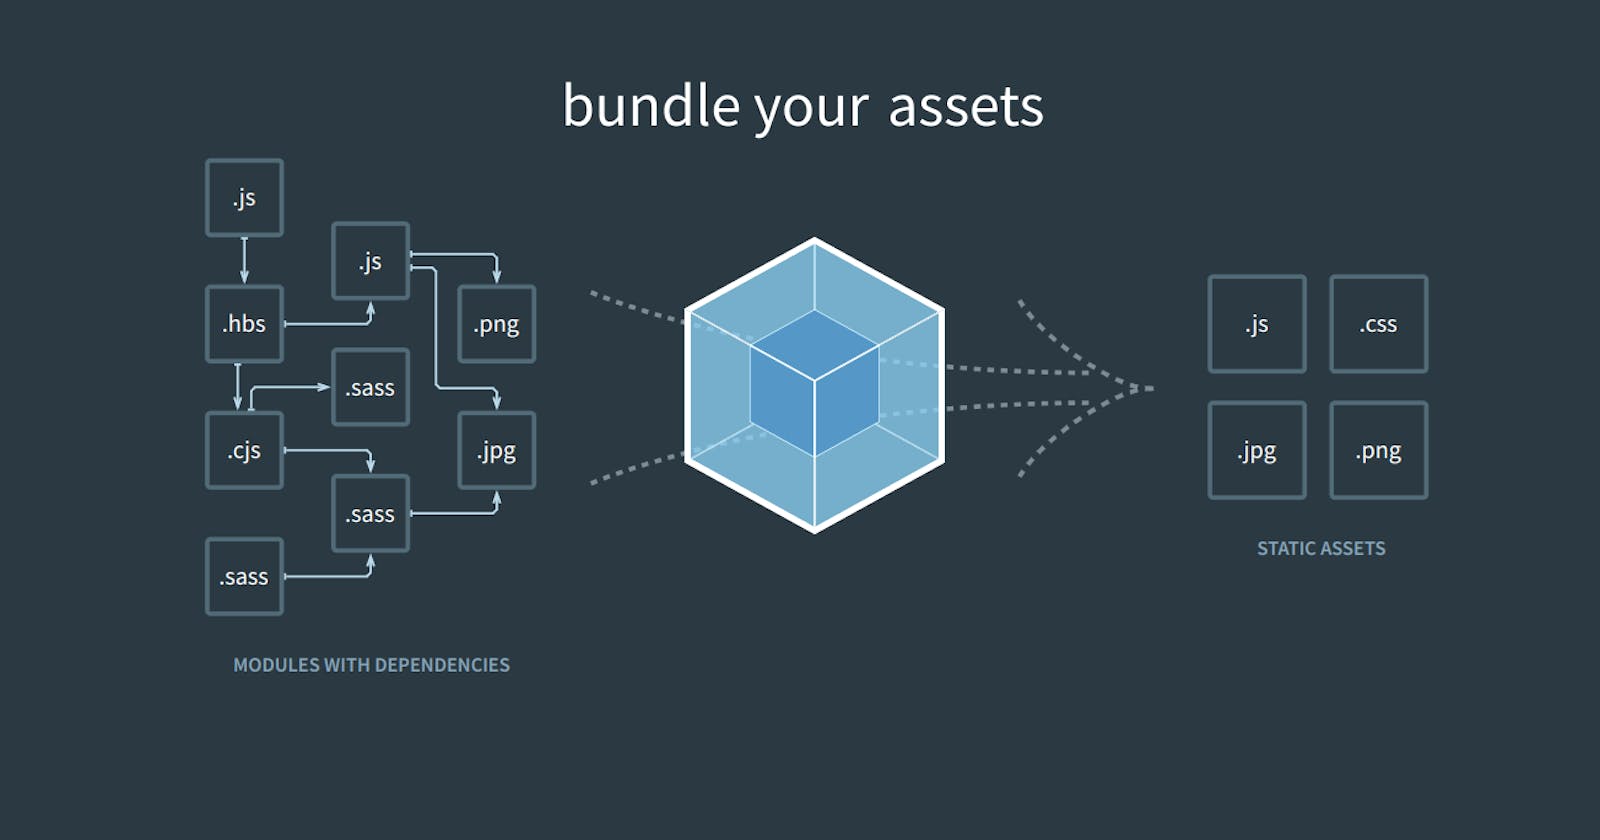
Webpack is a tool for bundling modules, who finds all the import or required statements and replaces them with the actual contents of each required file. It internally builds a dependancy graph from entry point and then combnes every module project needs into one or more bundles, which are static assets to serve your content from.
Why Webpack is Required
- In the early javascript world, oraganizing code in multiple files requires to load each file with globally shared variables, which was pritty inconvienent and unnecessary over-eating.
- Then
npmemerges as package manager for frontend, which made it easy to load required packages in specificjsfiles, but still have to manually include each package in files specifying full path such as:node_modules/something/min/something.min.js - Thereafter commonjs came with modules which allows to import and export code accross files without restoring to global variables and manually digging into path of packages
everything seems to be nice, but our dearBrowserdo not have access to file-system and import/export for browser are aliens. - Then comes the module bundler, A tool that solves the problem by creating a final output that is browser compatible and which does not need access to file the file-system.

Creating Webpack Starter Project
Open terminal, then create and change to directory hey-webpack, and then type:
npm init -y
Now you will see on file named package.json, it is a configuration file by npm to save all of your project information and the default contents of this file should look something like this:
{
  "name": "hey-webpack",
  "version": "1.0.0",
  "description": "",
  "main": "index.js",
  "scripts": {
    "test": "echo \"Error: no test specified\" && exit 1"
  },
  "keywords": [],
  "author": "",
  "license": "ISC"
}
This file will be used diffrentiate between development and production dependancies, automate repetitve tasks and to share with other developers.
Now create two directories src and dist, with files index.js and index.html as described below, and paste the following content into them:
hey-webpack
|- package.json
|- /src
    |- index.js
|- /dist
    |- index.html
index.js

function component(){
    const div = document.createElement('div');
    div.textContent = 'Getting Started With Webpack';
    return div;
}

const element = component();
document.body.appendChild(element);
index.html

<!DOCTYPE html>
<html>
  <head>
    <title>Getting Started With Webpack</title>
  </head>
  <body>
    <script src="./main.js"></script>
  </body>
</html>
Now type this into terminal and hit enter to install webpack, and observe the change a new directory named node_modules will be created
npm install --save-dev webpack webpack-cli
Here --save-dev means that these packages will be used for development only, not vibing see package.json
  "devDependencies": {
    "webpack": "^5.73.0",
    "webpack-cli": "^4.10.0",
  }
Time has arrived to bundle your modules, add the below under scripts in package.json,
  "scripts": {
    "build": "webpack --progress",
  }
Go to terminal, type the following and hit enter
npm run build
Buddy your done with your first build.

Setting up Asset CSS
- Assets are something of value that your project owns such as css, images, fonts and static data files.
- Webpack only understands javascript and json files, to make webpack undestand other file types(assets) you need to add
loaders. Loaders allow webpack to process other types of files and convert them into valid modules that can be consumed by application and added to the dependancy graph. - To make webpack understand css you are required to add css loaders, but before that you need to ad webpack config file
webpack.config.js. - A webpack config file is used for adding more powers to bundler and complex setup, and it is much more efficient than manually typing a lot of commands in terminal.
If `webpack.config.js` file is present, then webpack commands pick it by default - Create a
webpack.config.jsfile and paste the following into itconst path = require('path'); module.exports = { entry: './src/index.js', output: { filename: 'bundle.js', path: path.resolve(__dirname, 'dist'), },- Here
entryis entry point indicating which module should webpack use to begin building out its internal dependancy graph. By default value is./src/index.js - Here
outputproperty tells webpack where to emit the bundles it create and how to name these files. It defaults to./dist/main.jsfor the main output file and to the./distdirectory for any other generated file.
- Here
- Open terminal again and type this and then press enter to add css loaders to make css understandable for webpack
npm install --save-dev style-loader css-loader - Now paste the following into
webpack.config.js, and make sure the order of loaders is maintained first style-loader then css-loadermodule: { rules: [ { test: /\.css$/i, use: ['style-loader', 'css-loader'], }, ], }, - Create a new file
style.cssinsidesrcdirectory and paste the following code.hey-webpack { color: red; font-weight: 900; font-size: x-large; font-family: monospace; } - Import
style.cssinindex.jsand add classhey-webpackto itimport './style.css'; div.classList.add('hey-webpack'); - Now go to terminal and type build command
npm run build - Now your page should look like this:

Setting up Output Html
Now you will tell webpack to automatically build
index.htmland add bundle(script) into it. There are two ways to do it, and in both ways webpack, will insert bundle into the page(html file).Asking Webpack to Build Html File
Open terminal, type the following and hit enter
npm install --save-dev html-webpack-pluginNow paste following in
webpack.config.jsfileconst HtmlWebpackPlugin = require('html-webpack-plugin'); plugins: [ new HtmlWebpackPlugin({ title: 'Getting Started With Webpack', }), ],
- Now remove
distdirectory and type the following into terminal, and hit enternpm run build
Giving Webpack Template for Building Html File
- Remove
distdirectory and create a directorypublicand addindex.htmlto it, and paste the following into it:index.html <!DOCTYPE html> <html> <head> <title>Getting Started With Webpack</title> </head> <body> </body> </html> - Update the
webpack.config.jsfile as shown belowtemplate: path.resolve(__dirname, "public", "index.html") - Run build command into terminal and control the webpack.
- Remove
Setting up Task Runners
- A tool that automates different pieces of build process such as automatically running build command on changes, live reloading, running tests and more.
- In other words, Task Runners are automation scripts that are used to setup littel shortcuts for repetitve mundane terminal tasks.
- You will be setting task runners for automatically compiling code and refreshing browser whenever code changes
- Add this to scripts in
package.json, and open terminal type thisnpm run watchand hit enter to automatically generate build or compile code whenerver code changes"watch": "webpack --watch --progress" Now make some changes like adding a new component or add a child to parent component and see the build gets automatically compiled.
The downside to
watchscript is to refresh the browser to see the changes. To overcome this, you have to addwebpack-dev-serverwhich is a server and has ability to do live reloading.
- Open terminal and install dev-dependancy
npm install --save-dev webpack-dev-server - Now update
webpack.config.jsfile to tell dev server where to look for files and to serve the files from the dist directory on localhost:8080devServer: { static: './dist', } - Let's add a script to easily run the dev server as well
"start": "webpack serve --open"
- We are done, hurray you know webpack now 🎉🎉🎉.

More with Webpack
- Add loaders for other assets 🪙
- Sweeping dist directory on every build 🧹
- Fun with code spliting 😊
- Utilize resources with caching 💾
Conclusion
So this is webpack module bundler. We started from what is webpack bundler to javascript history shouting loudly why module bundlers like webpack are required then we went to creating a getting started with webpack project, here we learned to build our first bundle.
After that we used loaders to make webpack understand css(Highest ROI asset), then we took the burden off from shoulders of generating build html file, and told webpack to do this for us either by yourself or using our template.
Then we gave rest to our fingers from doing repetitve mundane terminal tasks, by writing shortcuts inside scripts in npm config file and concluded over journey with webpack.